How to implement Kubernetes observability through Istio, OpenTelemetry and Honeycomb
In this tutorial, we'll walk through the process of deploying Istio with OpenTelemetry and Honeycomb on a Kubernetes cluster. This setup enables observability and tracing for your microservices, providing valuable insights into your system's performance, latency, and error rates.
In this tutorial, we'll walk through the process of deploying Istio with OpenTelemetry and Honeycomb on a Kubernetes cluster. This setup enables observability and tracing for your microservices, providing valuable insights into your system's performance, latency, and error rates.
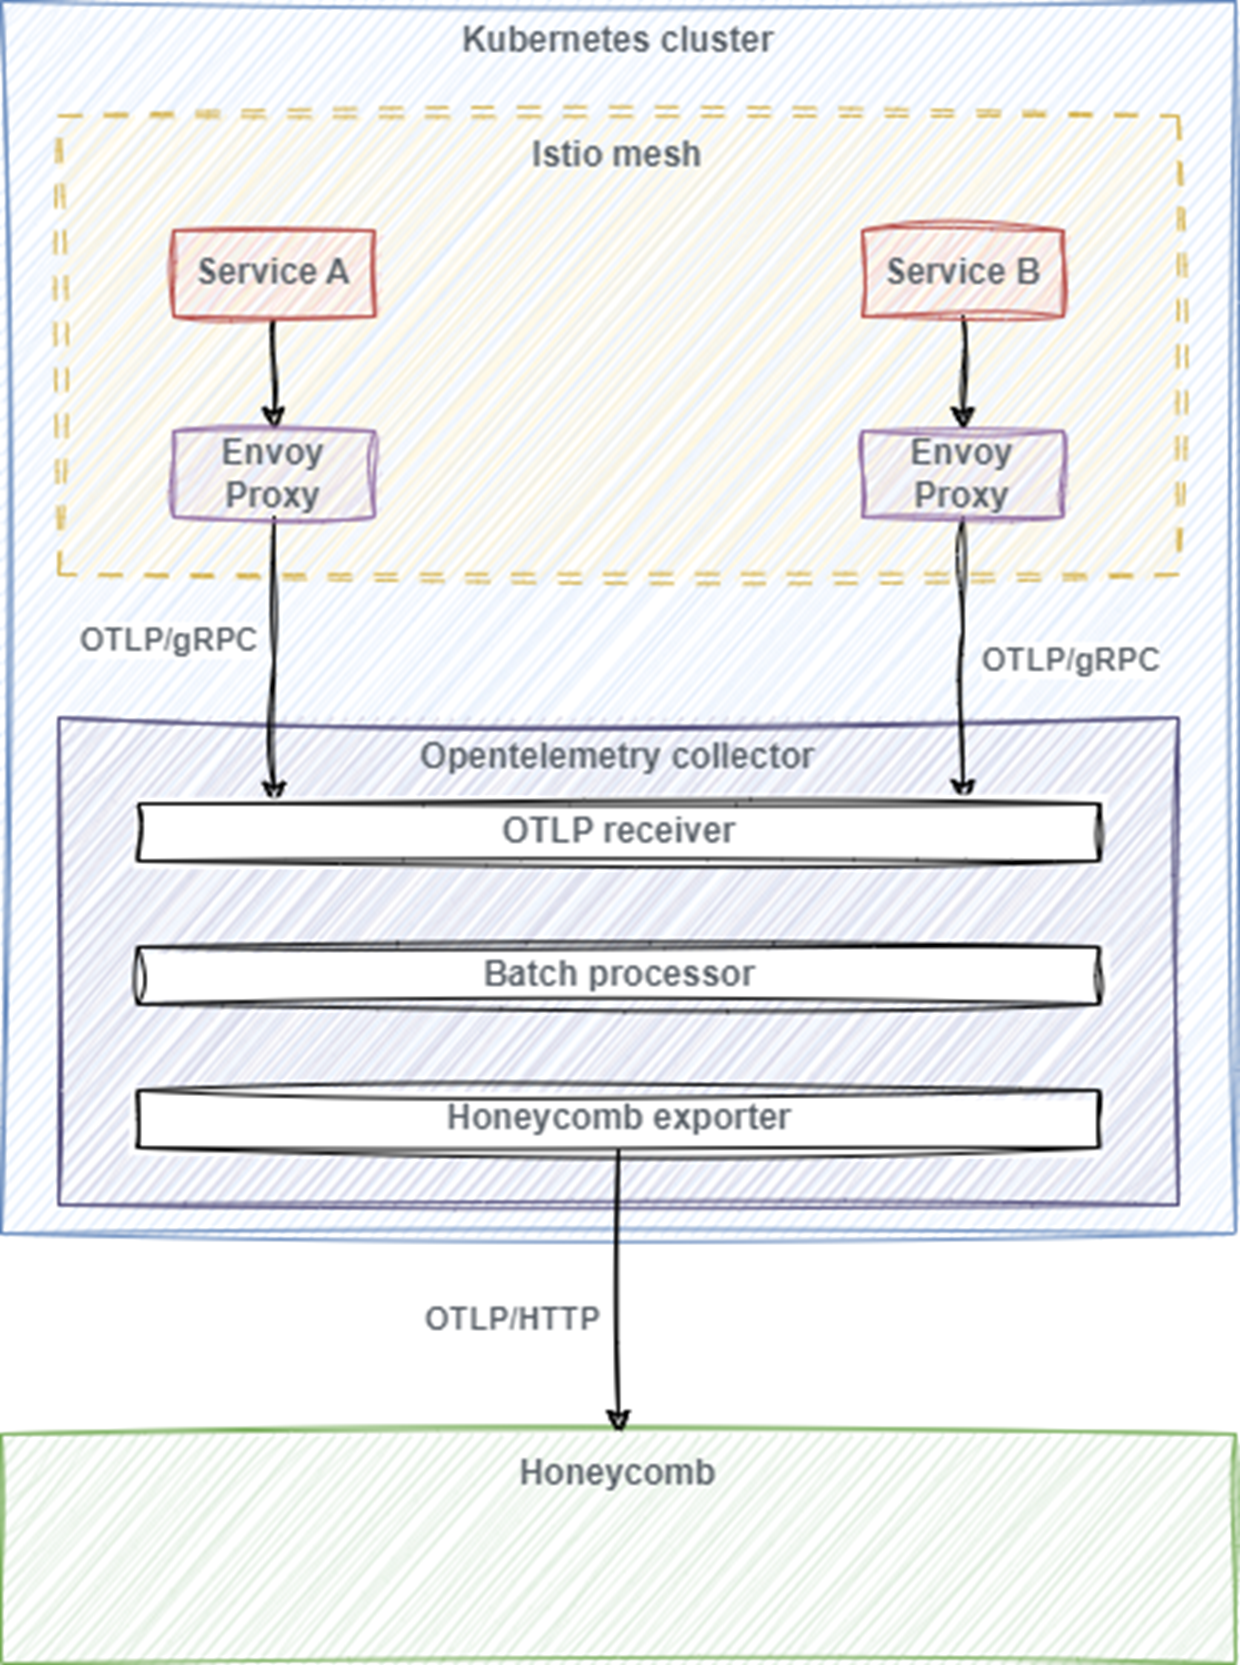
Here’s a list of the components needed and a short description of their role in this system:
a. Kubernetes Cluster: The base system where all components are deployed and running.
b. Istio Service Mesh: A layer of infrastructure within the Kubernetes cluster that enables observability, security, and traffic management for microservices.
c. Envoy Sidecar Proxy: Injected automatically by Istio into each pod within the service mesh. This proxy intercepts and routes traffic between microservices, and it's responsible for collecting telemetry data.
d. OpenTelemetry Collector: A separate service deployed within the Kubernetes cluster that receives telemetry data from the Envoy sidecar proxies.
· Receivers: Components that accept data from various protocols (in this case, OTLP via gRPC and HTTP).
· Processors: Components that can process and transform the telemetry data.
· Exporters: Components that send the telemetry data to external services (in this case, Honeycomb).
e. Honeycomb: A SaaS platform for observability and tracing that receives, stores, and visualizes the telemetry data sent by the OpenTelemetry Collector.
Prerequisites:
· Ensure you have a Kubernetes cluster up and running.
· Install the “kubectl” CLI tool.
· Install the “istioctl” CLI tool.
1. Install Istio:
Go to the Istio release page to download the installation file for your OS, or download and extract the latest release automatically (Linux or macOS):
curl -L https://istio.io/downloadIstio | sh -
Then, add the “istioctl” binary to your PATH and change to the Istio package directory:
cd istio-1.17.1
export PATH=$PWD/bin:$PATH
Now, install Istio using the default profile:
istioctl install --set profile=default
Label the desired namespace (default in our case) to enable Istio's sidecar injection:
kubectl label namespace default istio-injection=enabled
2. Deploy OpenTelemetry Collector:
First, create the otel-collector.yaml configuration file:
apiVersion: v1
kind: ConfigMap
metadata:
name: otel-collector-conf
namespace: default
data:
otel-collector-config: |
receivers:
otlp:
protocols:
grpc:
http:
processors:
batch:
extensions:
health_check:
exporters:
honeycomb:
api_key: "YOUR_HONEYCOMB_API_KEY"
dataset: "YOUR_DATASET_NAME"
api_url: "https://api.honeycomb.io"
service:
extensions: [health_check]
pipelines:
traces:
receivers: [otlp]
processors: [batch]
exporters: [honeycomb]
Replace "YOUR_HONEYCOMB_API_KEY" with your Honeycomb API key and "YOUR_DATASET_NAME" with the desired dataset name.
Next, create a deployment for the OpenTelemetry Collector:
apiVersion: apps/v1
kind: Deployment
metadata:
name: otel-collector
namespace: default
spec:
replicas: 1
selector:
matchLabels:
app: otel-collector
template:
metadata:
labels:
app: otel-collector
spec:
containers:
- name: otel-collector
image: otel/opentelemetry-collector:0.74.0
args:
- --config=/conf/otel-collector-config.yaml
- --log-level=DEBUG
ports:
- containerPort: 4317 # gRPC receiver
- containerPort: 55681 # HTTP receiver
- containerPort: 13133 # Health check extension
volumeMounts:
- name: otel-collector-config-vol
mountPath: /conf
volumes:
- configMap:
name: otel-collector-conf
name: otel-collector-config-vol
Apply the configuration to the Kubernetes cluster:
kubectl apply -f otel-collector.yaml
3. Configure Istio to send telemetry data to the OpenTelemetry Collector:
apiVersion: telemetry.istio.io/v1alpha1
kind: Telemetry
metadata:
name: opentelemetry-collector
namespace: default
spec:
tracing:
- providers:
- name: otel-collector
port:
number: 4317
sampleRate: 100.0
Apply the configuration to the Kubernetes cluster:
kubectl apply -f telemetry.yaml
4. Deploy your application
Deploy your application to the Kubernetes cluster with Istio's sidecar injection:
kubectl apply -f app.yaml
Now, your Istio service mesh is configured to send telemetry data to the OpenTelemetry Collector, which in turn sends the data to Honeycomb.

Kubernetes Security
Aprl, 2023 Yalos Team
Secure connection from an application running in Kubernetes to external databases. This article discusses the importance of security in Kubernetes and proposes a solution for securing connections between applications running in Kubernetes and external databases. We highlight the importance of protecting sensitive data from hackers and cybercrime. We suggest that security should be one of the primary concerns when deploying an application in Kubernetes.
read