Auto-update helm chart version using ArgoCD
Having had experience with Kubernetes for a few years, I’ve grown to appreciate the convenience of deploying and updating applications with Helm charts. In this article, my goal is to guide you on how to take this process a step further by automating the update procedure for Helm applications usingArgoCD. To illustrate, I will be using a Robusta Helm installation as an example.
Having had experience with Kubernetes for a few years, I’ve grown to appreciate the convenience of deploying and updating applications with Helm charts. In this article, my goal is to guide you on how to take this process a step further by automating the update procedure for Helm applications using ArgoCD. To illustrate, I will be using a Robusta Helm installation as an example.
ArgoCD is an open-source tool for automating and managing the deployment of applications to Kubernetes clusters, using GitOps principles. It provides a declarative approach to defining and maintaining the desired state of an application in a Kubernetes environment.
Robusta is an open-source application that is capable of monitoring and visualizing Kubernetes clusters. It provides metrics for monitoring cluster health and Kubernetes events and it integrates seamlessly with Prometheus.
Requirements
- kubectl command-line tool
- chocolatey/brew package manager
- jq command-line JSON processor
- pip Python package installer
Step 1 — Install ArgoCD and ArgoCD CLI
There are two ways to accomplish this task — you can either refer to the Getting Started section in the
official ArgoCD documentation or make use of the following commands:
kubectl create namespace
argocd
kubectl apply -n argocd -f
https://raw.githubusercontent.com/argoproj/argo-cd/stable/manifests/install.yaml
choco install argocd-cli
Step 2 —Login to ArgoCD
Upon ArgoCD installation, an admin password secret is automatically generated.
This secret is named argocd-initial-admin-secret and can be
decoded by executing the following command:
kubectl get secret -n argocd argocd-initial-admin-secret -o json | jq
.data.password -r | base64 -d
There are a couple of ways to access the ArgoCD UI — you can modify the service type of the argocd-server to LoadBalancer and set up an ingress. Further information on how to perform these actions can be found in the “Getting Started” article. However, for now, we will stick to using kubectl port-forwarding:
kubectl port-forward svc/argocd-server -n argocd
8080:443
The
ArgoCD server can be accessed at https://localhost:8080
To login using the CLI you’ll have to
execute the command below using the admin username and the password decoded
above.
argocd login
<ARGOCD-SERVER>
Step 3 — Install Robusta CLI and generate
Helm values
To
generate the helm values for the installation of Robusta, this step is
necessary. The installation guide provides a quick
way on setting up Robusta using Helm, but these instructions need to be
slightly adjusted for ArgoCD to enable automatic updates. This approach proved
helpful to me in a multi-cluster environment where manual updates would cause
unnecessary delays.
pip install -U robusta-cli --no-cache
robusta gen-config
Upon completion, a generated_values.yaml file will be created. This file includes the helm values that are necessary for deploying Robusta with ArgoCD in Step 5.
Step 4 — Connect Robusta Helm repository
to ArgoCD
You have the option to perform this task using either ArgoCD UI or CLI. If you
choose to use CLI, the command below can be used:
argocd repo add https://robusta-charts.storage.googleapis.com --type helm
--name robusta
Step 5 —Deploy ArgoCD helm chart
application
To deploy the ArgoCD application with the helm values, I will use the
declarative approach, but you can achieve the same outcome using ArgoCD UI. To
begin, you must build your application in a YAML manifest file called robusta-app.yaml, as shown in the
example below:
apiVersion:
argoproj.io/v1alpha1
kind: Application
metadata:
name: robusta
namespace: argocd
spec:
destination:
namespace: robusta
server: 'https://kubernetes.default.svc'
source:
repoURL: 'https://robusta-charts.storage.googleapis.com'
targetRevision: 0.10.12
chart: robusta
helm:
values: |
globalConfig:
signing_key: <signing_key_from_generated_values.yaml>
account_id: <account_id_from_generated_values.yaml>
sinksConfig:
- robusta_sink:
name: robusta_ui_sink
token: <token_from_generated_values.yaml>
enablePlatformPlaybooks: true
runner:
sendAdditionalTelemetry: true
rsa:
private: <private_from_generated_values>
public: <public_from_generated_values>
parameters:
- name: clusterName
value: demo_cluster
sources: []
project: default
syncPolicy:
automated:
prune: false
selfHeal: false
syncOptions:
- CreateNamespace=true
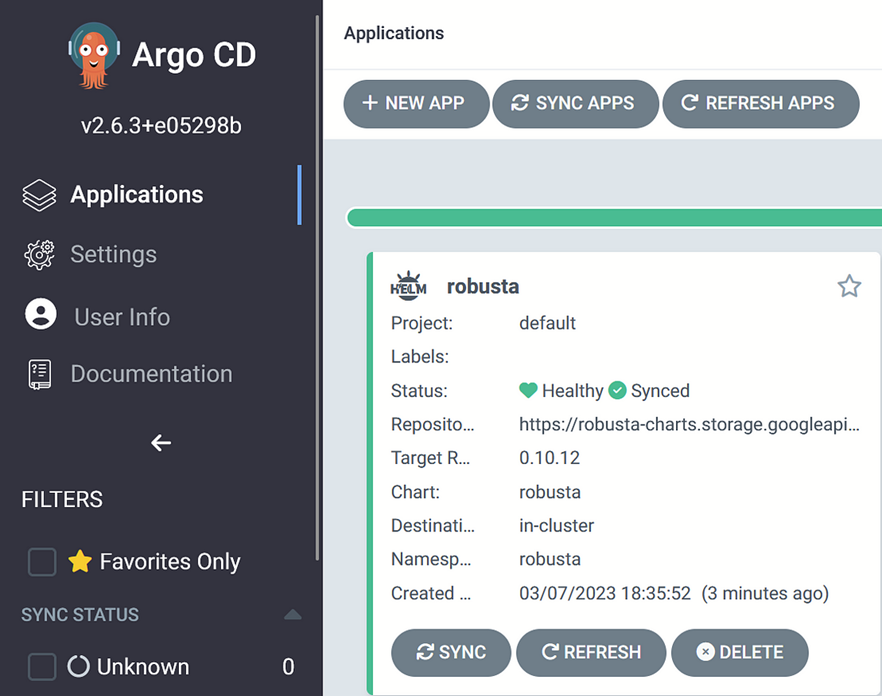
Once you create the application running kubectl apply -f robusta-app.yaml, you'll notice the application has been created in ArgoCD UI with Target Revision: 0.10.12
Step 6— Auto-update helm chart version
using ArgoCD
Although we have specified Automatic as
the SyncPolicy, we will not
receive automatic updates when new releases become available. The current
Robusta application will only synchronize and update if there are changes made
to chart version 0.10.12, which is unlikely to happen in a Helm environment.
Even if there are bugs that need to be fixed in 0.10.12, the fixes will likely
be released in a new Helm chart version (e.g., 0.10.13). Because we have set
the Target
Revision
to 0.10.12, we will not
receive automatic updates for those bugfixes.
To address this issue, we will be using a wildcard (*), changing the Target Revision to 0.10.*, which will ensure that we receive automatic updates for all patches of version 0.10.*. When a Helm chart with version 0.10.13 is released, the application will automatically be updated, as shown in the example below, eliminating the need for any manual intervention in your CD pipeline.
apiVersion:
argoproj.io/v1alpha1
kind: Application
metadata:
name: robusta
namespace: argocd
spec:
destination:
namespace: robusta
server: 'https://kubernetes.default.svc'
source:
repoURL: 'https://robusta-charts.storage.googleapis.com'
targetRevision: 0.10.*
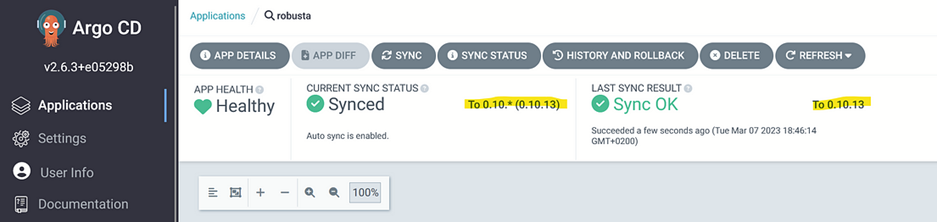
One can apply a comparable approach to automatically update both the minor version and patch version by going a step further. For instance, if the Robusta application is first deployed with a Target Revision of 0.9.17 and subsequently changed to 0.*.*, the helm chart version will be updated by ArgoCD to the most recent minor version of the specified major version (in this case - 0), which at the time of writing this article is 0.10.13. This can be seen in the two screenshots provided below.


I hope these instructions will help keep your Helm applications up to date. If you have any questions and would like to connect with me on a specific subject, please feel free to use the comment section on Medium or add me to your LinkedIn network. I’d be happy to chat and keep in touch!
References:
1. https://argo-cd.readthedocs.io/en/stable/getting_started/
2. https://docs.robusta.dev/master/installation.html
How to implement Kubernetes observability through Istio, OpenTelemetry and Honeycomb
Apr, 2023 Yalos Team
In this tutorial, we'll walk through the process of deploying Istio with OpenTelemetry and Honeycomb on a Kubernetes cluster. This setup enables observability and tracing for your microservices, providing valuable insights into your system's performance, latency, and error rates.
read