Minimal Admission Controller
Writing such a controller is as simple as writing any other controller. This post helps avoiding common pitfalls on coding your first one. With working code.
I am writing this post so that others don’t fall in the same pitfalls I did while developing my first admission controller. In fact, writing such a controller is as simple as writing any other controller.
There is correct documentation available on the Internet, as follows:
https://kubernetes.io/docs/reference/access-authn-authz/extensible-admission-controllers/ describes the topic in general terms;
https://docs.giantswarm.io/advanced/custom-admission-controller/ has an admission controller;
https://kubernetes.io/blog/2019/03/21/a-guide-to-kubernetes-admission-controllers/ covers the topic with a good example.
Still, I was unable to find anything that takes a novice developer from square one and guide them over the entire topic. Hence, this post.
Then again, I am developing on Windows. Yes, I am a gamer at heart. A 52 years old gamer and for this I still badly need Windows. Therefore, I am stuck with this OS.
The problem:
The diagram below shows the general architecture required for this topic.

This controller presented here works on the Mutating phase. It is basically a HTTPS server that gets called every time the control plane gets an event of interest. This controller is called each time a new pod is created.
There is a Git repository that contains the entire controller here: https://github.com/yalosvoios/admission-controller.
Enjoy!
Prerequisites
a. admin access to a kubernetes cluster
b. kubectl installed
c. docker installed
Registration
Admission webhooks are registered via MutatingWebhookConfiguration objects. The following is a basic definition of such an object:
apiVersion: admissionregistration.k8s.io/v1
kind: MutatingWebhookConfiguration
metadata:
name: yalos
webhooks:
- admissionReviewVersions:
- v1
clientConfig:
caBundle: CERTIFICATE-REMOVED-FOR-BREVITY
service:
name: admission
namespace: yalos
port: 443
failurePolicy: Ignore
matchPolicy: Equivalent
name: yalos.k8s.io
rules:
- operations: ["CREATE"]
apiGroups: [""]
apiVersions: ["v1"]
resources: ["pods"]
sideEffects: None
timeoutSeconds: 30
There are two important sections, namely:
(1) clientConfig – allows you to declare an admission webhook for newly created pod objects.
clientConfig:
caBundle: EXPAND-CA-HERE
service:
name: admission
namespace: yalos
port: 443
(2) rules – allows you to define the service the control plane will call with the resources of interest to this webhook.
rules:
- operations: ["CREATE"]
apiGroups: [""]
apiVersions: ["v1"]
resources: ["pods"]
This identifies the resources the hook works on as GVR (Group Version Resource) and the operations (one can have multiple entries there).
According to documentation, the naming is important - “The name of the admission webhook. Name should be fully qualified, e.g., imagepolicy.kubernetes.io, where "imagepolicy" is the name of the webhook, and kubernetes.io is the name of the organization. Required.” This information is taken from the Dev Tool. In the above example the name is given as admitter.yalos.io.
Certificates
The API server only calls HTTPS. It is ok to use self-signed certificates as long as the following are observed:
The certificate authority is in the MutatingWebhookConfiguration (previous section). The API server uses this CA to validate the server certificates.
The server certificate should be correctly issued for the service defined in the previous section. There, the service is named admission and the namespace is yalos. Therefore, the certificates are issued for admission.yalos.svc
There is a secret in the repository as follows:
apiVersion: v1
data:
caCert.pem: CERTIFICATE-REMOVED-FOR-BREVITY
caKey.pem: KEY-REMOVED-FOR-BREVITY
serverCert.pem: CERTIFICATE-REMOVED-FOR-BREVITY
serverKey.pem: KEY-REMOVED-FOR-BREVITY
kind: Secret
metadata:
name: tls-certs
namespace: yalos
type: Opaque
This secret is used to correctly setup the HTTPS server.
There is a script (config.sh) that generates all necessary certificates in the repository. It will also create new YAML files with the newly generated certificates.
If you are running this on non-Windows systems you might need to //CN=${CN_BASE} to /CN=${CN_BASE} in config.sh.
Server
Two more YAML files declare a deployment for the HTTPS server, and a service to publish it:
apiVersion: apps/v1
kind: Deployment
metadata:
name: admission
namespace: yalos
spec:
replicas: 1
selector:
matchLabels:
app: admission
template:
metadata:
labels:
app: admission
spec:
containers:
- name: admission
image: admission
resources:
limits:
cpu: "1"
memory: 1024Mi
requests:
cpu: "0.05"
memory: 1024Mi
ports:
- containerPort: 8443
volumeMounts:
- name: tls-certs
mountPath: "/etc/tls"
readOnly: true
volumes:
- name: tls-certs
secret:
secretName: tls-certs
kind: Service
apiVersion: v1
metadata:
name: admission
namespace: yalos
spec:
ports:
- name: http
protocol: TCP
port: 443
targetPort: 8443
selector:
app: admission
type: ClusterIP
sessionAffinity: None
internalTrafficPolicy: Cluster
Under the hood
First step is to setup and start a HTTPS server. The code is straightforward. It relies on net/HTTP (extract from main.go):
certs := readCertificates()
if certs == nil {
klog.Fatalf("Cannot read certificates")
}
server := &http.Server{
Addr: ":8443", //TODO: parameter here
TLSConfig: configTLS(certs.cert, certs.key),
}
if err := server.ListenAndServeTLS("", ""); err != nil {
klog.Fatalf("HTTPS Error: %s", err)
}
The code to read and arm the certificate is in cert.go
A basic handler for the server is implemented as follows:
handler := newHandler()
if handler == nil {
klog.Fatalf("Cannot instanciate the handler")
}
http.HandleFunc("/", func(w http.ResponseWriter, r *http.Request) {
handler.Serve(w, r)
})
At this point everything is in place. The control plane will call for every pod creation.
Admission code to set resources
This example will amend every pod created without resource constraints with a default small quota. For brevity, it only works on single container pods. For multi-containers it will only amend the first one.
The API server calls with an AdmissionReview object, in JSON format. The handler replies with an AdmissionResponse.
The code to handle this is in handler.go
func (h *handler) Serve(w http.ResponseWriter, r *http.Request) {
var body []byte
if r.Body != nil {
if data, err := ioutil.ReadAll(r.Body); err == nil {
body = data
}
}
reviewResponse := h.admit(body)
ar := v1.AdmissionReview{
Response: reviewResponse,
TypeMeta: metav1.TypeMeta{
Kind: "AdmissionReview",
APIVersion: "admission.k8s.io/v1",
},
}
resp, err := json.Marshal(ar)
if err != nil {
klog.Error(err)
return
}
_, err = w.Write(resp)
if err != nil {
klog.Error(err)
return
}
}
This is a simple implementation of a HTTP handler that reads data from the request and processes it in a different function. For an AdmissionReview object example check the test folder.
The admit function works on the AdmissionReview with the purpose of creating a list with one or more patches. The eventual patches are then returned via an AdmissionResponse object. It is important to recognize that the entire mechanics works on the concept of patching. The same patches as those issued via kubectl patch apply in this case. The code is below:
func (h *handler) admit(data []byte) *v1.AdmissionResponse {
response := v1.AdmissionResponse{}
response.Allowed = true
review := v1.AdmissionReview{}
if err := json.Unmarshal(data, &review); err != nil {
klog.Error(err)
return &response
}
response.UID = review.Request.UID
patches, err := h.getPatches(*review.Request)
if err != nil {
klog.Error(err)
return &response
}
if len(patches) > 0 {
patch, err := json.Marshal(patches)
if err != nil {
klog.Errorf("Cannot marshal the patch %v: %v", patches, err)
return &response
}
patchType := v1.PatchTypeJSONPatch
response.PatchType = &patchType
response.Patch = patch
klog.V(4).Infof("Sending patches: %v", patches)
}
return &response
}
The response will eventually contain no patches if the pod already has the resources set and as many patches as required to fully populate both (1) the request and (2) the limit resources with memory and CPU.
The function computing the patches is below:
func (h *handler) getPatches(ar v1.AdmissionRequest) ([]patchRecord, error) {
if ar.Resource.Version != "v1" {
return nil, fmt.Errorf("only v1 Pods are supported")
}
raw, namespace := ar.Object.Raw, ar.Namespace
pod := corev1.Pod{}
if err := json.Unmarshal(raw, &pod); err != nil {
return nil, err
}
if len(pod.Name) == 0 {
pod.Name = pod.GenerateName + "%"
pod.Namespace = namespace
}
mark := pod.Spec.Containers[0].Resources
patches := []patchRecord{}
if mark.Limits == nil && mark.Requests == nil {
patches = append(patches, h.initResourchesPatch())
}
if mark.Limits == nil {
patches = append(patches, h.initResourceValue("limits"))
}
if mark.Requests == nil {
patches = append(patches, h.initResourceValue("requests"))
}
if mark.Limits == nil || mark.Limits.Cpu().String() == "" {
patches = append(patches, h.initRequirementValuePatch("limits", "cpu", "200m"))
}
if mark.Limits == nil || mark.Limits.Memory().String() == "" {
patches = append(patches, h.initRequirementValuePatch("limits", "memory", "2048Ki"))
}
if mark.Requests == nil || mark.Requests.Cpu().String() == "" {
patches = append(patches, h.initRequirementValuePatch("requests", "cpu", "100m"))
}
if mark.Requests == nil || mark.Requests.Memory().String() == "" {
patches = append(patches, h.initRequirementValuePatch("requests", "memory", "1024Ki"))
}
return patches, nil
}
It basically verifies if the properties are missing and, if so, it creates them.
An example of a function creating such a patch is below:
func (h *handler) initResourchesPatch() patchRecord {
return patchRecord{
Op: "add",
Path: "/spec/containers/0/resources",
Value: corev1.ResourceRequirements{},
}
}
In closing
To see this at work, in the YAML folder do:
· kubectl create ns yalos
· kubectl apply -f .
Then you can read the logs of the admission controller. Not much there (silence is golden) 😊
In the test folder there is a test.yaml that starts a busybox with no limits. Go in this folder and do
· kubectl apply -f test.yaml
· kubectl get pod busybox -o yaml
The result should look like this:
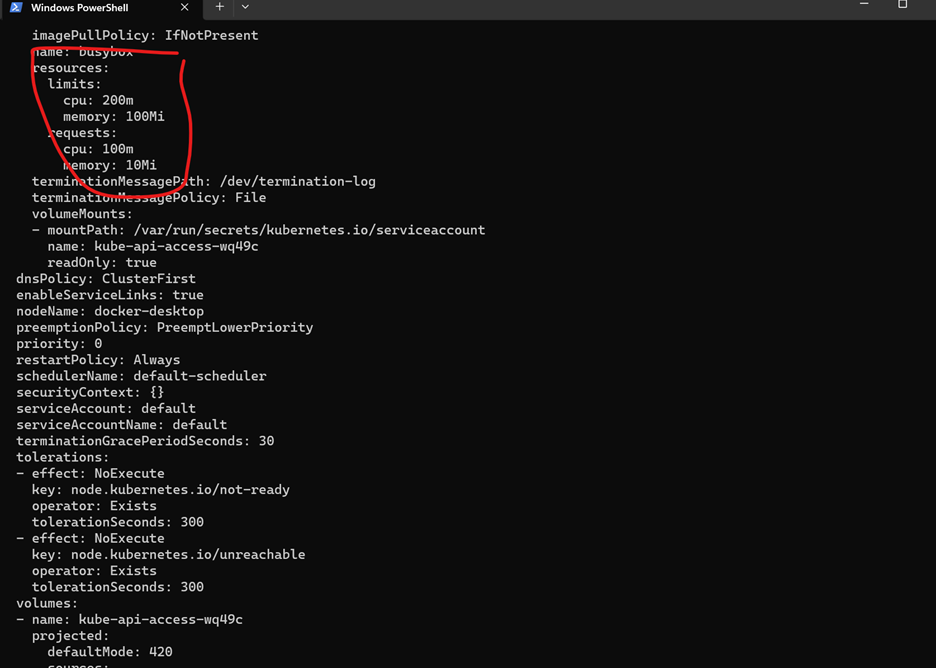
There are other topics slightly beyond the scope of this article as follows:
How to build the system
There is good documentation available here https://docs.docker.com/language/golang/build-images/ for how to create a container out of the docker code. This example uses the multistage variant as it gives small container sizes.
From a command prompt just do:
docker build .
What editor I use
I am doing everything on Windows. As mentioned straight from the start, I plan on sticking to this.
Lately MS did a very good job with Visual Studio Code. It is free and has a great system of extensions. I run locally the go code and I have all the goodies I always wanted: breakpoints, call stack, watches, stepping.
The configuration is simple, just a simple JSON file and it is not machine dependent. It is checked in the repo under the .vscode folder.
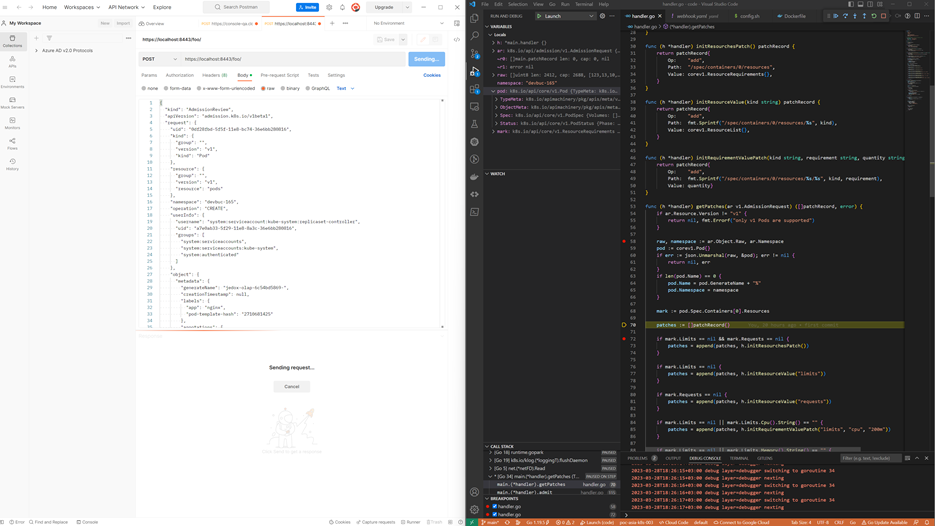
How hard it is for me to debug
Typically, when I develop, I am able to develop on my desktop and then deploy with minimal effort. This is quite doable for code that queries the kube API (both direct, like a list function call or indirect like informers, listers and so on). In this case I was unable to do so. The basics is that the control plane should call my server (under development) and so far, I am unable to do this piping. Therefore, I simulate calls from the control plane with Postman. As written above, I left in the folder test a sample AdmissionReview. This is the one I used for test purposes. The picture below shows my toolset in action:
This is all, folks!
Volume Snapshots
Mar, 2023 Yalos Team
This article provides a tutorial on creating dynamic persistent volumes using Azure Disks, in an AKS cluster. It also covers the process of creating a snapshot of the persistent volume.
read